How to Enable Remote Desktop Connection via Computer Management
Administrators oftentimes need to meet the expected support to their clients and users in times of incident. For example, a computer needs to be checked and calling via telephone to gather information from user about their problem can be slow. Adding to this is the tedious gathering of information from user like the type of error, the red-x’s appearing on icons that is not supposed to appear and the list goes on.
Finally, the need to deliver instructions on resolving the issue might be painstaking for your user and you as well. The solution to these troubleshooting headache was aided by the use of remote access software. By utilizing the available network access to the device, the administrator can perform the troubleshooting and checking of the computer remotely, with minimal user intervention.
Various tools are created for remote access. One among them is Windows Remote Desktop. This built-in Windows feature allows administrators to access Windows computers without using 3rd party remote access tools. Hence, it lessens 3rd party access to your network minimizing the risk of security breach from misuse of third party remote access tools.
The problem is, which other administrators had experience is that the computer they try to remotely control cannot be accessed. Domain admin account also have limitations in terms of remote access if certain setting on the user computer blocks remote access.
I will be describing the way I use Computer Management, to add accounts to Remote Desktop Users Group.
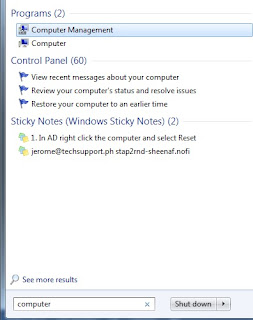
On a Windows computer, navigate to Start then type “Computer Management” on “Search programs and files” search box. Click the relevant result showing “Computer Management” which is usually the first selection. Alternatively, you can use Win Key + R then type in “compmgmt.msc” to the run box. The window will appear showing the Computer Management.

To access the user computer that needs to be configured for remote access, right click on “Computer Management (local)” and select “Connect to another computer”. This option will allow you to connect to another computer using the hostname or the IP address. After gaining access to that computer, expand “System Tools” then expand “Local Users and Groups”. Select and expand “Groups”. Right click “Remote Desktop Users” and select “Add to Group”. Remote Desktop Users group are granted right to logon remotely. Add your domain user name and click the apply button. Changes are immediate, and if successful, you will be able to remotely access the PC with the entered account name.

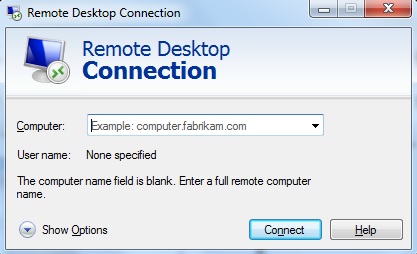
To user Windows Remote Desktop Connection, navigate to Start then type “Remote Desktop Connection” on “Search programs and files” search box. Click the relevant result showing “Remote Desktop Connection” which is usually the first selection. Alternatively, you can use Win Key + R then type in “mstsc.exe” to the run box. The window will appear showing the Remote Desktop Connection window. Enter the hostname or IP address and login using correct credentials. The currently logged on user will be switched user. In case if the remote desktop user credential is same as currently logged user, that user will see lock screen when the remote user successfully accessed the computer.

Finally, the need to deliver instructions on resolving the issue might be painstaking for your user and you as well. The solution to these troubleshooting headache was aided by the use of remote access software. By utilizing the available network access to the device, the administrator can perform the troubleshooting and checking of the computer remotely, with minimal user intervention.
Various tools are created for remote access. One among them is Windows Remote Desktop. This built-in Windows feature allows administrators to access Windows computers without using 3rd party remote access tools. Hence, it lessens 3rd party access to your network minimizing the risk of security breach from misuse of third party remote access tools.
The problem is, which other administrators had experience is that the computer they try to remotely control cannot be accessed. Domain admin account also have limitations in terms of remote access if certain setting on the user computer blocks remote access.
I will be describing the way I use Computer Management, to add accounts to Remote Desktop Users Group.


To access the user computer that needs to be configured for remote access, right click on “Computer Management (local)” and select “Connect to another computer”. This option will allow you to connect to another computer using the hostname or the IP address. After gaining access to that computer, expand “System Tools” then expand “Local Users and Groups”. Select and expand “Groups”. Right click “Remote Desktop Users” and select “Add to Group”. Remote Desktop Users group are granted right to logon remotely. Add your domain user name and click the apply button. Changes are immediate, and if successful, you will be able to remotely access the PC with the entered account name.

To user Windows Remote Desktop Connection, navigate to Start then type “Remote Desktop Connection” on “Search programs and files” search box. Click the relevant result showing “Remote Desktop Connection” which is usually the first selection. Alternatively, you can use Win Key + R then type in “mstsc.exe” to the run box. The window will appear showing the Remote Desktop Connection window. Enter the hostname or IP address and login using correct credentials. The currently logged on user will be switched user. In case if the remote desktop user credential is same as currently logged user, that user will see lock screen when the remote user successfully accessed the computer.


Comments
Post a Comment